The ways to enable TPM and Secure Boot in your PC may find difficult if it’s done for the first time. Don’t worry about that, here we have stepped forward to help the Windows 10 PC with endless boot problem. To enable TPM and Secure Boot on Windows10, the user has to check the status of Secure Boot, through the System Information app, then after the PC is rebooted into BIOS the user has to enable it beneath the boot setting. And, next the user has to check the status of TPM under Windows security, then the user has to reboot the PC into BIOS and next the user has to enable it under the boot setting if TPM isn’t available. The Trusted Platform Module, known as TPM is a chip that is soldered to the computer’s motherboard to help the PC, tamper resistance.

Trusted Platform Module was originally designed to provide security and privacy benefits to the platform users. As the technology developed, we could find that everything is designed as per the wish of providing users the best facility to be comfortable while using. So, the newer versions now available is been conditioned with the needed privacy and security assistance along with the hardware. For an advanced situation, the TPM must be provisioned. The TPM 2.0 enables greater crypto agility than TPM 1.2. TPM is accessible since the Windows 7 era and is been evolved with different versions as the years pass by.
What Is Secure Boot In Windows?
Secure Boot ensures the PC, boots trusted operating systems, and provides a measure of security. This feature is included in UEFI (Unified Extensible Firmware Interface) based computers running Windows 8 or Windows Server 2012 and later. The feature of Secure Boot guides and make sure that the device boots only with the software trusted by the laptop manufacturer. This feature is necessary, to be sure that the PC won’t boot from USB devices, which may be loaded with an operating system that is not trustworthy. If multiple operating systems are booted then the Secure Boot is often turned off. But this feature must be turned on if in case the user is only using Windows. Any of the security software running on the operating system can’t prevent malicious code from being entered into the pre-boot environment of the system. If the user hasn’t ever done anything with the BIOS setting, we are here to guide systematically as per the convenience of the user.
- Also Read About: How To Take Screenshot On Windows
How To Check Secure Boot Status
To check whether the PC has Secure boot enabled follow the steps mentioned below:
- Click on Start Menu and type msinfo32 and press Enter.
- Click on the System Information app to open it.
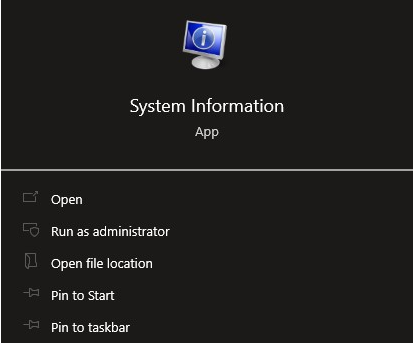
- A new pop-up window with the information related to your system will show.
- Find if Secure Boot State is On/Off, it lays on the middle right side of the screen.

How To Enable Secure Boot In Windows 10
If the Secure Boot State is off then it is available and is disabled. To enable it the user has to look into PC UEFI / BIOS’ settings. Here the steps are given according to modern PC, and this may vary depending on the PC manufacturer. So, the user must be cautious to check the websites supporting your PC.
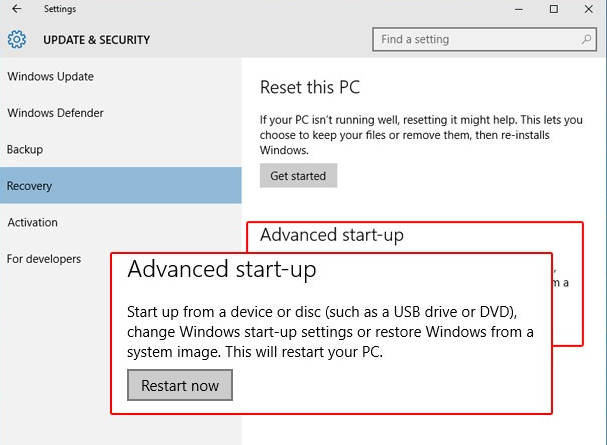
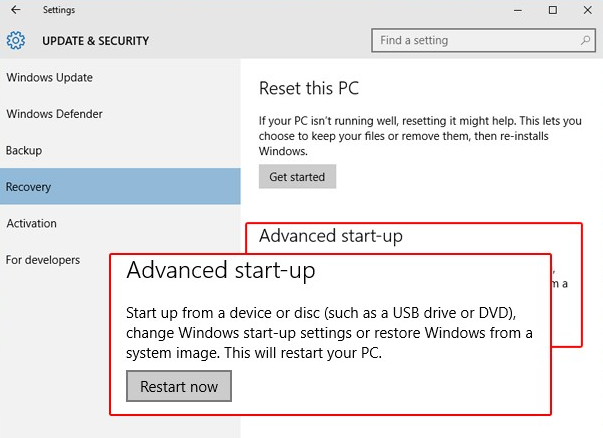
- Click on the Start Button and then on Settings.
- Navigate to Update and Security -> Recovery -> Advanced start-up and click on Restart Now.
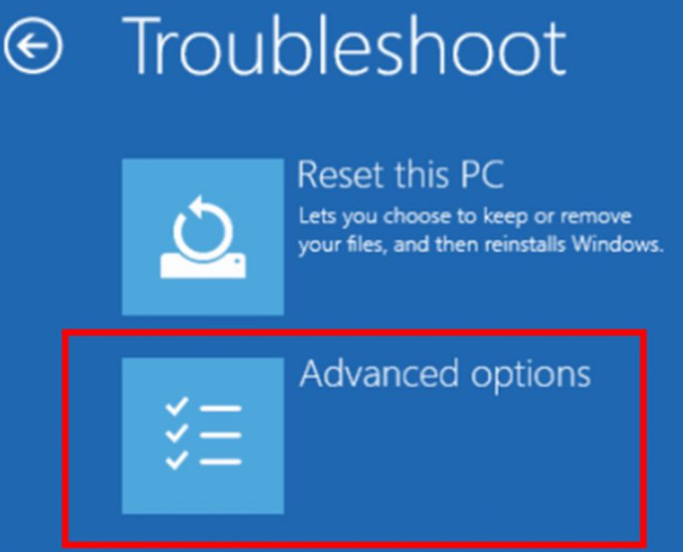
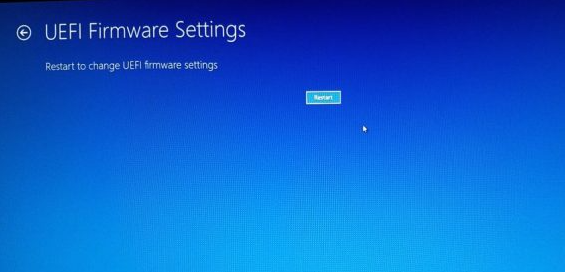
- As the PC reboots the user has to click Troubleshoot> Advanced Options> UEFI Firmware Settings.
- In the UEFI firmware settings the user could find Secure Boot Setting.
- It is found under Security/ Boot/ Authentication.
- Enable Secure Boot and Save.
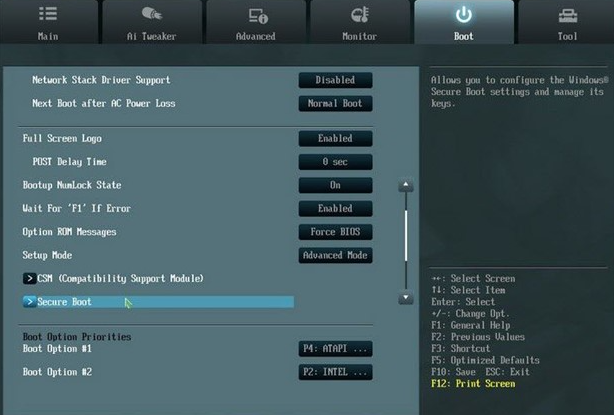
- Then apply the settings using the key combination and restart your machine.
How To Check TPM Status and Enable TPM In Windows 10
There are a couple of ways available to check TPM status in Windows 10 and you can follow any of them. Just follow the steps mentioned below to check if TPM is enabled or not for your Windows 10 device.
#1. Using Windows Security App
- Click on the Start button and search Windows Security.
- Open Windows Security app.
- Now, click on the Device Security tab.
- Find and click on Security Processor details.
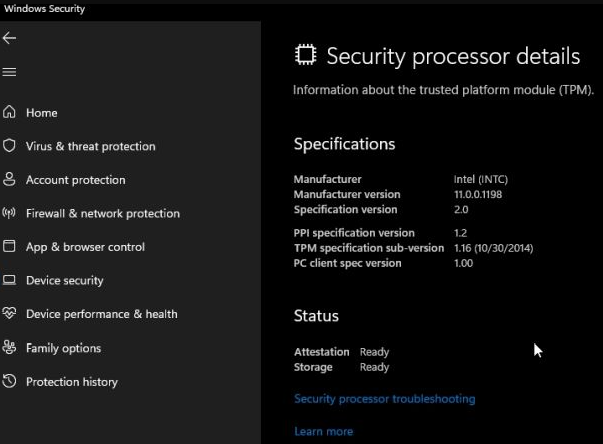
You will be able to see all details related to the TPM of your machine along with the TPM version. If you are not getting the Security Processor Details option in the Device Securit tab, then you can follow this second method to check the TPM status of your Windows 10 device.
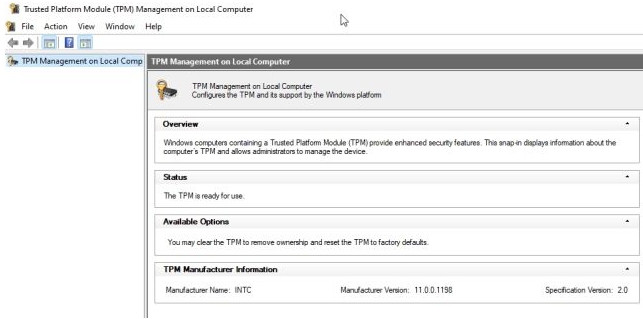
#2. Using The RUN Box
- Press Windows Key + R to open the RUN dialog box.
- Type “tpm.msc” (without quotes) and press Enter.
- A new Trusted Platform Module Management window will appear.
- Check the status of TPM in the box.
How To Enable TPM In Windows 10 From BIOS
To enable TPM on your Windows 10 device, you will have to boot into the BIOS or UEFI interface. It is the same like we did earlier to enable the Secure Boot. If you have missed the steps mentioned above, then you can follow the steps mentioned below to enable TPM in Windows 10.
- First of all, restart your device.
- Now, press the boot key continuously to enter the boot menu.
- Generally, it is Del or F12 key.
- Alternatively, you can also enter BIOS by rebooting your PC from the settings menu.
- Open Settings app and navigate to Update & Security > Recovery > Restart Now.
- Now your PC will restart in recovery mode, so you have to navigate to Troubleshoot > Advanced Options > UEFI Firmware Settings > Restart.
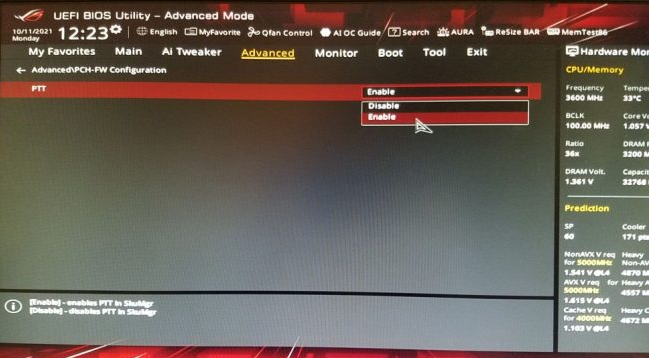
When you are into to BIOS of your system, navigate to Advanced tap and find PCH-FW Configuration. If the PTT Option is disabled on your device, then toggle the button to Enable it. Once done, click F10 or use the keyboard to click on Save and restart your device again.
Check The Windows Security Center
Along with TPM and Secure Boot status check, the user might need to check the Security Center in Windows10. Without any subscription or payment, the Security Center in Windows 10 offers some in-built security protections from malware, spyware, and other security threats and these offers stand in a great strong opponent to threats. the user in Start has to search for Windows Security Center to access it. Then scan under Virus and Threat Protection to find any threats. Turn on real-time protection and cloud-delivered protection, to ensure that the downloaded malware won’t run and gets faster protection. The above guide provided might have helped many users to accomplish what they were feeling lack of on the user’s PC.
- Also Read About: How To Password Protect Windows Folders
Windows 11 security is been highly talked about in its security and privacy benefits. As per Microsoft, it says that Windows 11 is “security backed by a hardware root-of-trust”. So windows11 requires minimum hardware requirements, which makes it user-friendly and highly secure. Windows 11 is more praised for its facility of having such security, this makes the user having Windows10 worry about its security. Even if Windows 10 doesn’t have the features of Windows 11, never makes it less useful and never means that Windows 10 can’t protect the user from hackers and other security threats. This guide is to navigate the users of Windows 10 to enable this feature by the user itself, to secure the PC from hackers and security threats.
Final Words
Sometimes the user can’t upgrade the PC to Windows 11 and this may pile up a user’s tension on the PC security and privacy. But the fact is that they shouldn’t worry about this factor as, till the year, 2025 Microsoft will support it. And the most important thing to note is that under Windows 10, with basic TPM 1.2 and secure boot the user’s PC is safe. As TPM and Secure Boot are available to provide needed privacy and security, the need to worry about it is unnecessary.