Windows 11 could still be regarded as a relatively small evolution of Windows 10, and you don’t have to pay to upgrade. The main difference is that they introduced some new hardware requirements. So, we think it just creates an easier way to talk about machines that satisfy the requirements for these newer versions of Windows. It’s not really like a whole new edition. We’ve heard nothing that threatens application or driver compatibility. It is always wondering how they were going to deal with the fact that Windows 10 needed to be able to evolve to keep up with the capabilities of new hardware without, at some point, having to impose new hardware requirements.
There are a lot of things that we like about Windows 11, like the UI, animations, multitasking considerations, tablet gestures. But there are also too many things that we don’t like and some features that were removed. Hopefully, Windows 11 will re-add these features. For the time being, we will get to know about the steps to take screenshots in Windows 10 as well as 11. Screenshot on windows is undoubtedly the most important feature of the operating system. Not only that, some research shows that the Screenshot feature of windows is the most used feature of windows OS.
Note– These methods are applicable on both windows 10 as well as Windows 11.
Top 4 Ways To Take Screenshot On Windows 10 & Windows 11
Method #1. Using Win+ PrtScr Key
Windows-based devices come with a lot of dedicated keys. These are meant to perform a diverse variety of functionalities. On the keyboard, you will find a lot of wind keys that are unaware to you. While some keys are used most of the time. Windows key is mainly used for almost anything if you want to search something, look for a program, want to go to settings, or just want to turn off/restart your computer. While these are some of the basic use but combining windows keys with different keys can perform a diverse range of functions. So let us discuss one of the most important functions of the windows key.
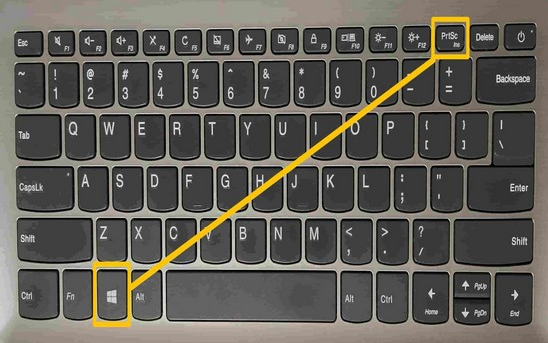
The most reliable way to take a screenshot is by using the Windows key along with the Prt Sc key. The Print Screen keyboard key causes a full-screen screenshot to be saved to the clipboard. From there you can paste it into a program that is capable of handling an image.
- Press and hold the Windows key and then click on Print Sc ( situated on the top right section of the keyboard, although it can vary and depends upon the manufacturer of the Keyboard).
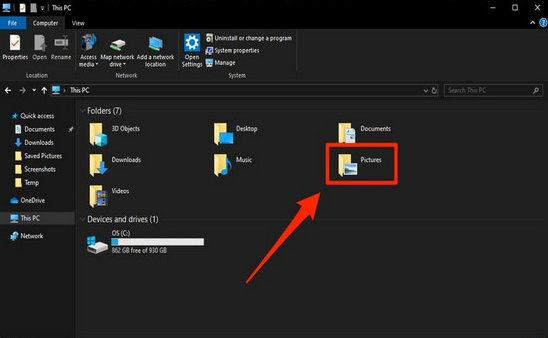
- The screenshot will be captured in Fullscreen and it will be saved in Pictures > Screenshots. You can quickly go to the screenshot folder by searching “Screenshot” in the search bar.
Location of Screenshot Images (Win + Prt Sc)
Screenshots are taken with PrtScn (“Print Screen”) or Alt-PrtScn go to the Windows Clipboard; they’re not saved anywhere until you paste the contents of the Clipboard to an application that understands graphics and you do a Save. The exception and there may be several if you have an application that automatically captures PrtScn to a file. Dropbox is one-such, but there are others. They are stored in an uncompressed state on the clipboard. This is for use to paste (like pasting anything from the clipboard) into supported programs (such as Microsoft Word).
However, some programs (like Dropbox’s Desktop Client) can detect the Print Screen key being pressed and may automatically compress the uncompressed data into a file to be uploaded to Dropbox (findable in your Dropbox folder). However, if you want to save a file with the Print Screen key, you can use the Windows Key+Print Screen Key combination and it will save your file to the Documents/Pictures folder.
Method #2. Using Game Bar
If you have Windows 10 as well as Windows 11 then you have this Game bar feature built-in. With the help of it, you can make a video of everything that happens on the screen. You can also capture pictures. You can find these captured images in the captures or Screenshot folder. Game Bar is an Xbox app that has been developed to make gaming easy and comprehensible, it is primarily used to control activities related to the game, like game streaming, Broadcasting, and capturing clips while playing games. When you record a video via the game bar, it will get saved as .mp4 while the screenshots are in .png format.
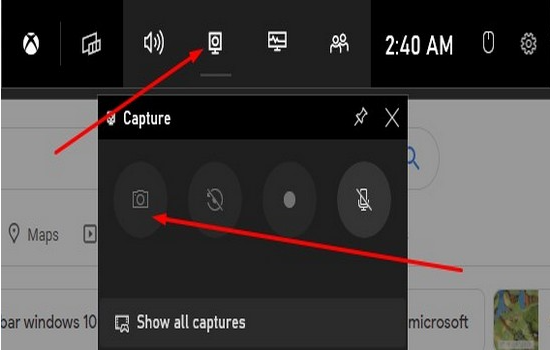
- Go to the settings of your windows and click on the gaming tab, if you aren’t able to find it then simply search “gaming”.
- Now click on the Capture option in gaming, you can make changes to the settings of Game Bar from the right side according to your preference.
Method #3. Using Snipping Tool
Snipping Tool is a kind of tool that makes taking screenshots easier and more precisely. It not only allows you to make a cropped version of your screen, but lets you make many regular and irregular shapes, and perhaps its second most important feature is that it lets your draw, paint, and write on the snippets you make so you can amplify and annotate just what you want your audience to see. One must keep in mind that Chromebooks do not have the Snip function. But you can search the Google play store and find many of them for free. These are the required step to use the snipping tool in Windows 10 as well as Windows 11.
- By clicking on Win+ Shift + S, you can turn on the Snipping tool. It is the most vital tool to capture a part of the screen
- Clicking on these keys will dim the screen and a small menu will appear on the screen. You will see four buttons that have different functionalities.
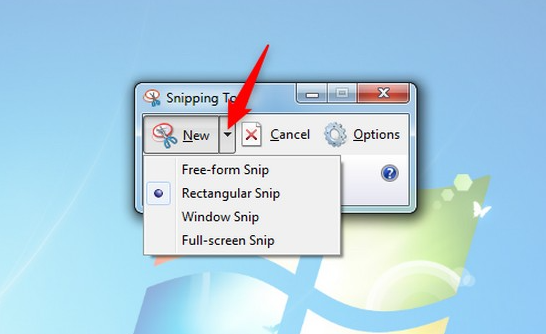
- Rectangular Snip – This snip is useful to capture smaller parts of the screen. You can draw a rectangular area on the screen and the snipping tool will capture that area only.
- Freeform Snip – This snip option allows you to draw a shape according to your choice, the screenshot will be captured based on your drawn shape.
- Window Snip – This snip option is used to capture only the image of particular windows. It is more like Windows snip but it allows you to capture the image of the open window.
- Full-screen Snip – It is used to capture the whole area of the screen and it is pretty much similar to Win + Prt Sc.
Storage of Screenshot Captured By Snipping Tool
A better approach is to use the built-in Snipping Tool. It can copy to the clipboard, but it also allows you to specify a file in which to save the image and you can put that file in a folder of your choosing. It also allows you to copy just a portion of the screen, which is usually a better choice. Windows 10 and 11 have a default folder name “Snip and Sketch” in Pictures.
Method #4. Using Third-Party Apps
You can also use a variety of apps to capture screenshots as well for recording your screen. Third-party apps can help you in capturing a particular section of your screen and you can also modify the captured screenshot according to your preference. The captured screenshot is also displayed in the app so that you can easily modify and edit the images. So, let us get to know about some of the best third-party apps which can help you in taking the screenshot.
Screenrec
This app is not just meant to capture the screen of windows, it is a full-fledged app that can help you in capturing screenshots as well as you can also record your screen. It is a free app and it is regarded as the fastest screen capturing app for Windows OS.
Lightshot
This windows-based can allow you to take a quick screenshot of your screen. After that, you can easily edit the picture with the help of a pre-installed editor in the app. Unfortunately, it doesn’t save automatically. It stays in Clipboard history where you can go later and save accordingly.
Final Words:
Taking a screenshot on both versions of Windows OS is quite easy and comprehensible. Although, it also matters how you want to take a screenshot, like size, orientation, length, etc. We have discussed precisely all the conventional methods to capture a screenshot on Windows 10 as well as Windows 11. Windows 10 is more like an attempt to combine the best of Windows OS ever created. While improving performance and security and leveraging as much user data as they can get. Serious gamers seem to like Windows 10, so they must have done something right. On the other hand, Windows 11 has just made its way to the world and we can’t say anything in particular about this Windows OS for the time being.